Hello again, this is the Azure AD B2C Custom Policies post series.
Introduction
I started the series with a description of how to begin working with custom policies and showing my favourite way to do this. In short – instead of using any example policies published on the Internet, which may be outdated and not exactly match our requirements, I suggested exporting the existing build in policies after configuring them as closely to requirements as possible. This post will explain how to make this exported content importable back. Because, surprise, it is not.
Split the file
First thing you want to do is split the exported file into many files, each containing only a single policy. Why do we want to split it? There are several reasons – first is that even if the file was “correct” it’s too big – there is a size limit of 2 MB for a policy file. Second, you can’t upload multiple policies using a single file as the validator expects TrustedFrameworkPolicy (notice singular here, unlike in the exported file) to be a root element of the XML file.

For now I’ll stick with the idea already described that the suggested structure of policies is BASE > EXTension > Relaying Party (RP). For sake of explanations however I’ll save all five of them in separate files. If you take a look into the previous post of the series you will have no problem with identifying which parts of the exported file contain which policies. I already did the split (without any changes in the content yet) and now I have following files/policies:
| File | PolicyId |
| CustomBASE.xml | B2CTRUSTFRAMEWORKBASEV2-PROD-AM3-001-000 |
| CustomGLOBAL.xml | B2CTRUSTFRAMEWORKGLOBALCONTENT-PROD-AM3-001-000 |
| Constraint.XML | B2CTrustFrameworkV2 |
| CustomEXT.xml | base-v1 |
| CustomRP.xml | B2C_1_MyPolicy |
There is a structure of inheritance between them so we want to start from the foundations – the BASE.
The BASE policy
Before making any explenation let’s try to upload this file to our tenant.
I will intentionally make no change at all at this point despite it makes little sense. This is what I get:

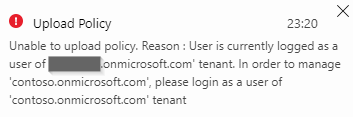
Well, this is somewhat cryptic. But what it means is that you try uploading a policy that targets what you’re not allowed to target – cpimcore. Why isn’t is stated more explicitly remains a mystery because if I only update policy settings with any other tenant name and even a random GUID (tenant Id) I get:
So, lesson no 1 – things can get cryptic from time to time.
Let’s change policy attributes to something meaningful then and put the data of our tenant there:
|
1 2 3 4 5 6 7 8 9 |
<TrustFrameworkPolicy xmlns:xsi="http://www.w3.org/2001/XMLSchema-instance" xmlns:xsd="http://www.w3.org/2001/XMLSchema" xmlns="http://schemas.microsoft.com/online/cpim/schemas/2013/06" PolicySchemaVersion="0.3.0.0" TenantId="mytenant.onmicrosoft.com" <!-- your tenant domain --> PolicyId="CustomBASE" PublicPolicyUri="http://mytenant.onmicrosoft.com" <!-- your tenant domain + policy name--> TenantObjectId="9a1f5aeb-4a14-4a3d-969d-1cdd10a82a36"> <!-- your tenant ID --> |
and upload it:
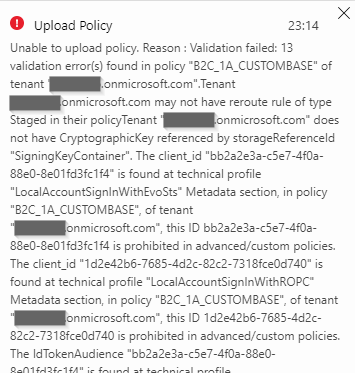
Right… And the list of errors goes on, and on. Basically it’s because the BASE policy references objects created within cpimcore and you can’t use them. Once you go custom you need to configure your AAD and B2C services so you can provide a replacement for every of the values listed in those errors.
All these objects have to be “local” from your tenant point of view. Basically there are values related to two different object types:
Application IDs
There are two GUIDs appearing in the error context:
- bb2a2e3a-c5e7-4f0a-88e0-8e01fd3fc1f4
- 1d2e42b6-7685-4d2c-82c2-7318fce0d740
These are Application IDs of two applications registered in AAD which handle users signing in and signing up. You can find step-by-step description how to create these apps here:
Then you need to replace the two GUIDs mentioned above with Application IDs of apps you just created. There is a helpful image in the docs too. Without any deep dive, which we don’t need at this point, it shows which value should go where:
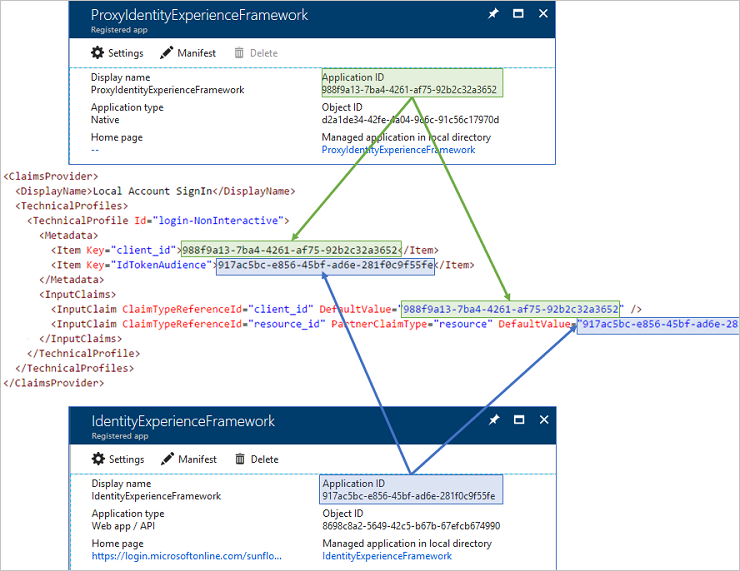
Unfortunately it references the example from the starter pack. We are doing things in a different way and need to adopt. Basing on what we created and what the helpful image shows we can make a simple rule to quickly sort this issue out. You need to do the following replacements
| Current | New |
| bb2a2e3a-c5e7-4f0a-88e0-8e01fd3fc1f4 | {IdentityExperienceFramework (the Web App / API app) Application ID} |
| 1d2e42b6-7685-4d2c-82c2-7318fce0d740 | {ProxyIdentityExperienceFramework (the Native app) Appplication ID} |
We may take a closer look at it later in the series, but it should be enough to just replace it without too many questions for now.
Key Containers
The second type of objects are missing Key Containers. Documentation has something on this too:
What I recommend however is sticking with names that already are in the policy as closely as possible. It makes things easier in the beginning.
You should create 4 keys, or more if you have chosen any external identity provider like Facebook when creating the build in policy. Just use the same names which appear in the policy, they will get created with the B2C_1A_ prefix (as every custom object you create in your B2C tenant) so you will need to replace some values in the policy file anyway.
All the keys should use the RSA key type. Their names are rather self-describing when it comes to Key usage attribute – all *SigningKeyContainer are for signing and *EncryptionKeyContainer are for encryption.
After creating keys just replace the references (names) in the file – SigningKeyContainer to B2C_1A_SigningKeyContainer and so on.
Routing rule
There is a last remaining thing to address:
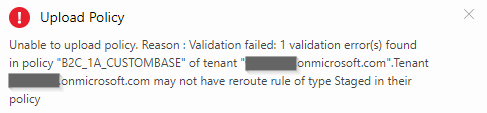
Just get rid of this part:
|
1 2 3 4 5 |
<PolicyConstraints> <RerouteRules Type="Staged"> <RerouteRule PolicyId="B2CTrustFrameworkBaseV2-{deploymentunit}" /> </RerouteRules> </PolicyConstraints> |
And voilla, your BASE policy should now be uploadable.

Before the EXT
I said I will stick to the BASE > EXT > RP structure but to avoid confusion caused by omitting the other two just to explain them in the end I want to make some short notes on them here.
The policy which contains a constraint does not pose any real value to us, it’s purely technical and with use only for base policies on cpimcore tenant. I think we can stop caring about this one (at least for now).
The other one, which contains content definitions and localizations is an interesting one. Let’s do an experiment – make some small fixes (a new name and referencing our tenant) and try to upload it:

We can’t do it. The message says something about the size so the idea of further splitting comes into mind. But that is actually not necessary. Despite being in the middle of the inheritance structure it can be
completely omitted from your custom policies structure as it is global indeed (as its name in the exported file suggests). In the file we exported it does reference the cpimcore tenant but it really is present and “publishes” all its content in every tenant including the Identity Experience Framework (the “custom”) part. That means your policies referencing any content definition or localization will work even if you don’t have them defined in your custom policies files.
Knowing that we can safely move on to the EXT policy.
The EXTensions policy
Depending on what settings you made in your policy via Azure Portal before exporting policy file, the EXTensions policy may have many different objects in it. But what definitely is in every EXT policy is a reference to a parent policy.
|
1 2 3 4 |
<BasePolicy> <TenantId>cpimcore.onmicrosoft.com</TenantId> <PolicyId>B2CTrustFrameworkV2</PolicyId> </BasePolicy> |
You need to update this to match your tenant name and the name of the BASE policy you just uploaded. Remember that all created custom objects are prefixed with a “B2C_1A_” prefix which needs to be included here. So, for my setup it looks this way:
|
1 2 3 4 |
<BasePolicy> <TenantId>mytenant.onmicrosoft.com</TenantId> <PolicyId>B2C_1A_CustomBASE</PolicyId> </BasePolicy> |
Regarding the names – you probably also want to update a policy name (PolicyId) in the TrustFrameworkPolicy object in a similar way it was done with the BASE policy to something nicer than “base-v1”.
If everything went well this policy should be uploadable as well.
NOTE
The description above assumes (in case of EXT policy and following RP policy) that you upload custom policies to the same tenant you exported from. If this is not the case some more adjustments have to be made. Take a look into the appendix at the end of the post.
The Relying Party (RP) policy and the final result
This is should be easy. You just need to update parent policy to point to the EXT.
|
1 2 3 4 |
<BasePolicy> <TenantId>mytenant.onmicrosoft.com</TenantId> <PolicyId>B2C_1A_CustomEXT</PolicyId> </BasePolicy> |
You may want to change the policy name (PolicyId) too because it already has a prefix from build-in policy creation (B2C_1_) and after uploading it will get another one (B2C_1A_). This should be enough and you can try to upload now.
Having uploaded all three policies we can try if everything works. Let’s open the policy blade in Azure Portal…
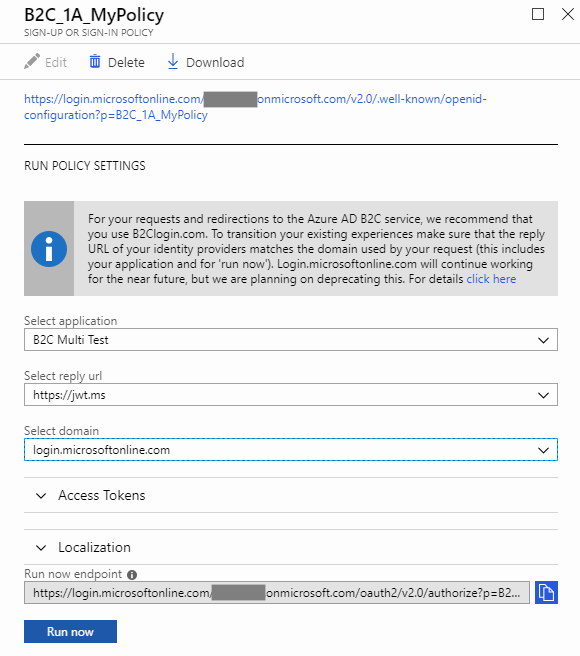
… and hit Run now
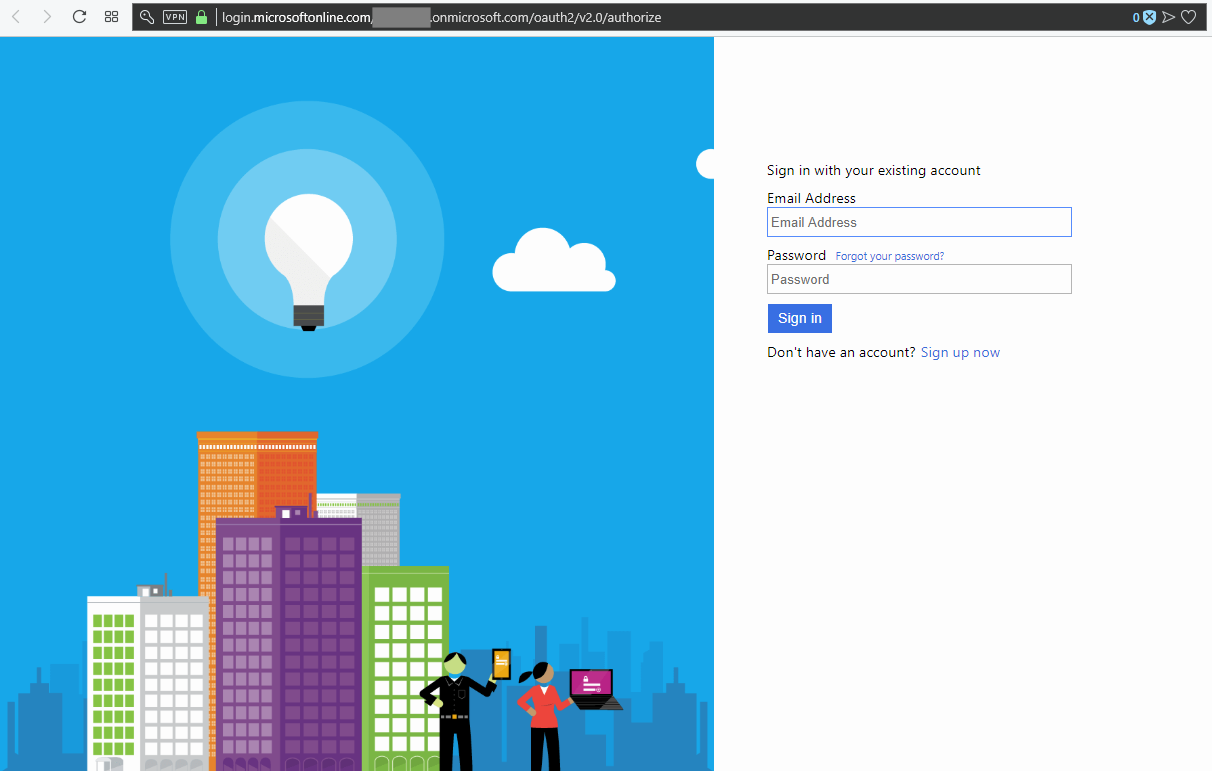
We got ourselves a custom policy!
Well, to be honest it can still not work in theory but most of the GUIDs that you put there are validated, one way or another, during the upload. If you’re not getting any Internal Server Errors (can happen!) and haven’t made any changes in other policy settings yet then it probably works.
I had a Sign-in/sign-up policy exported so in my case signing up a new user and signing in with new credentials makes a good test.
What’s next
Now that is a good question. Having uploadable policies gives us a lot of possible directions. I already have some interesting ideas on my mind but I’m tempted to make the next post about something practical, helpful which can also be used in many different ways – the policy parameters or maybe the integration with Application Insights? Can’t promise which of these two will come first.
Appendix – different upload tenant
When you exported from one tenant but want to upload custom policies to another one you need to always remember about referencing the TenantId and TenantObjectId of a proper tenant in all the policies. This is relatively easy to remember because the upload validation should throw a proper error message at you. This error message is rather clear and we already saw it in this post (fail to upload a policy referencing contoso tenant).
What is a bit more difficult to solve is an error about some kind of GUID in the EXT policy which will pop up if you upload to a different tenant. You probably noticed that the EXT policy contains an object looking similar to this one:
|
1 2 3 4 5 6 7 8 9 10 11 |
<ClaimsProvider> <DisplayName>Azure Active Directory</DisplayName> <TechnicalProfiles> <TechnicalProfile Id="AAD-Common"> <Metadata> <Item Key="ClientId">42c14e4b-5110-4516-a8d0-63e4822d54e2</Item> <Item Key="ApplicationObjectId">1096c763-4c81-4b91-967e-8c7e2f3c5c3e</Item> </Metadata> </TechnicalProfile> </TechnicalProfiles> </ClaimsProvider> |
The identifiers you can see there and need to replace when changing tenant come from another AAD application. This time it’s an app which handles storing user data.

The fact that it wasn’t named this way earlier (it was a plain “b2c-extensions-app”) and was renamed should make you think twice before tinkerint with it. The warning was explicitly put in the app name and there probably was a reason to do this. That’s as big a warning sign as it gets. Breaking something with this app can effectively break your B2C tenant.
Still, we need to take a small peek inside because that’s where the values we need are hidden:
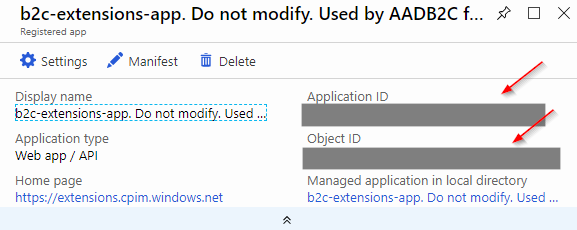
You need to replace ClientId item with Application ID and the ApplicationObjectId with an Object ID.
This changes should make the EXT policy uploadable to a different tenant than it was exported from.
You are an absolute legend. Thanks very much for this series
Two years later and still relevant. Super useful series.
Absolutely without doubt one of the best articles regarding B2C
Many thanks
//A
Hello Wojtek
Let me first thank you for your series on custom policies where you showed us how to actually download ‘built in’ policies (user flows) and create custom policies from them. Amazing work! I managed to do that correctly, but I have a problem. I would like to restrict email signup to a particular email domain. Can you help me with that?
I tried changing the following:
Please enter a valid email address.
^[a-zA-Z0-9!#$%&’+^_
{}~-]+(?:\.[a-zA-Z0-9!#$%&'+^_{}~-]+)*@(?:[a-zA-Z0-9](?:[a-zA-Z0-9-]*[a-zA-Z0-9])?\.)+[a-zA-Z0-9](?:[a-zA-Z0-9-]*[a-zA-Z0-9])?$To
Please enter a valid email address.
^[a-zA-Z0-9.!#$%&’^_`{}~\-]+@(protonmail[.]com|ipsos[.]com)
This should restrict the email domain to protonmail and ipsos.com.
Which when used with other custom policies seems to work. I’m not sure this is even the correct place to change the regex, as other email objects do exist.
For example:
or
Can you help?
I managed to do it. I just changed the regex pattern in ALL the email claims